How to use Apache as Reverse Proxy on Centos 7 with selinux

Introduction

In addition to being a “basic” web server, and providing static and dynamic content to end-users, Apache httpd (as well as most other web servers) can also act as a reverse proxy server, also-known-as a “gateway” server.

In such scenarios, httpd itself does not generate or host the data, but rather the content is obtained by one or several backend servers, which normally have no direct connection to the external network. As httpd receives a request from a client, the request itself is proxied to one of these backend servers, which then handles the request, generates the content and then sends this content back to httpd, which then generates the actual HTTP response back to the client.

There are numerous reasons for such an implementation, but generally the typical rationales are due to security, high-availability, load-balancing and centralized authentication/authorization.

It is critical in these implementations that the layout, design and architecture of the backend infrastructure (those servers which actually handle the requests) are insulated and protected from the outside; as far as the client is concerned, the reverse proxy server is the sole source of all content.

More is here.

Typical implemetation is below:

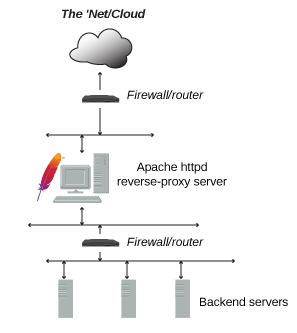
In this tutorial, we will set up Apache as a basic reverse proxy using the mod_proxy extension to redirect incoming connections to one or several backend servers running on the same network. This Apache Proxy Server also creates and manages security (ssl engine, https). Conection to the backend servers from this Proxy Server is not encrypted (only http). Next, we will use https (ssl certificates from Let’s Encrypt for ours conections from outside world, but not to backend.

Installation

For a minimum HTTP server instalation install apache itself:

yum install httpd -y

Make sure, that the “/etc/hosts” file contain references for the loopback address and the hostname

127.0.0.1   localhost localhost.localdomain localhost4 localhost4.localdomain4
192.168.3.3 edge-proxy-e edge-proxy-e.gonscak.sk

Turn on the HTTP server, and make sure it starts automatically on reboot. Next, add http port to the firewalld.

systemctl start httpd.service
systemctl enable httpd.service 
firewall-cmd --add-service=http --permanent
firewall-cmd --reload

Now, we can test our apache test web page on http address. This page is there fer testing and informational purposes:

http://edge-proxy-e.gonscak.sk

If you see the test page above, then your server is now correctly installed.

Example – Reverse Proxying a Single Backend Server

Create a first configuration file for our test backend server (I assume, that you already have one).

vim /etc/httpd/conf.d/test-vhost.conf

<VirtualHost *:80>
    ServerName edge-proxy-e.gonscak.sk
    ProxyPreserveHost On
    ProxyPass / http://media.gonscak.sk/
    ProxyPassReverse / http://media.gonscak.sk/
</VirtualHost>

There are three directives here:

  • ProxyPreserveHost makes Apache pass the original Host header to the backend server. This is useful, as it makes the backend server aware of the address used to access the application.
  • ProxyPass is the main proxy configuration directive. In this case, it specifies that everything under the root URL (/) should be mapped to the backend server at the given address. For example, if Apache gets a request for /example, it will connect to http://media.gonscak.sk/example and return the response to the original client.
  • ProxyPassReverse should have the same configuration as ProxyPass. It tells Apache to modify the response headers from backend server. This makes sure that if the backend server returns a location redirect header, the client’s browser will be redirected to the proxy address and not the backend server address, which would not work as intended.

Now, we can test out configuration with the first command below. It runs a configuration file syntax test and report OK or error. And with second command we gracefully restarts Apache httpd daemon. If the daemon is not running, it is not started. Currently open connections are not aborted:

apachectl configtest
apachectl graceful

And now, if everything is OK, we can open out web page now (http://192.168.3.3). We now not see the default page of apache, but the content of backend server media.gonscak.sk. We are not connected directly to the media.gonscak.sk, but only to the “edge” server with Apache.

Enabling SSL support, set certificates from LetsEcnrypt

First, we must install package mod_ssl for Apache to support SSL:

yum install mod_ssl.x86_64

Now, we must open port 443 for Apache in firewall:

firewall-cmd --add-service=https --permanent
firewall-cmd --reload

Now, we create o text file, where we set up some directives for vhost. And then we can simple change som SSL directives for all vhosts in Apache. I use some Mozilla recommendations via https://mozilla.github.io/server-side-tls/ssl-config-generator:

    SSLEngine on
    	SSLCertificateFile /etc/pki/tls/certs/newclient.crt
    	SSLCertificateKeyFile /etc/pki/tls/private/newclient.key
    	SSLCACertificateFile /etc/pki/tls/certs/ca.crt
    Header always set Strict-Transport-Security "max-age=15768000"

SSLProtocol             all -SSLv3 -TLSv1 -TLSv1.1
SSLCipherSuite          ECDHE-ECDSA-AES256-GCM-SHA384:ECDHE-RSA-AES256-GCM-SHA384:ECDHE-ECDSA-CHACHA20-POLY1305:ECDHE-RSA-CHACHA20-POLY1305:ECDHE-ECDSA-AES128-GCM-SHA256:ECDHE-RSA-AES128-GCM-SHA256:ECDHE-ECDSA-AES256-SHA384:ECDHE-RSA-AES256-SHA384:ECDHE-ECDSA-AES128-SHA256:ECDHE-RSA-AES128-SHA256

SSLHonorCipherOrder     on
SSLCompression          off

Next, I create an empty directory for DocumentRoot. There will be no content:

mkdir -p /var/www/vhosts/sk.gonscak.media

I edit config file for “/etc/httpd/conf.d/test-vhost.conf” and add virtualhost for ssl. And add link for log files.

<VirtualHost *:80>
    ServerAdmin webmaster@gonscak.sk
    ServerName edge-proxy-e.gonscak.sk
    AddDefaultCharset UTF-8
    RedirectPermanent / https://edge-proxy-e.gonscak.sk/
</VirtualHost>

<VirtualHost *:443>
    ServerAdmin webmaster@gonscak.sk
    DocumentRoot "/var/www/vhosts/sk.gonscak.media"
    AddDefaultCharset UTF-8
    ServerName edge-proxy-e.gonscak.sk

    ErrorLog /var/log/httpd/sk.gonscak.media-error_log
    CustomLog /var/log/httpd/sk.gonscak.media-access_log common
    Include	/etc/httpd/conf.d/modern-ssl-template.txt

  <IfModule mod_proxy.c>
   ProxyRequests Off
   ProxyPass /.well-known/ !
   ProxyPass / http://media.gonscak.sk/
   ProxyPassReverse / http://media.gonscak.sk/
   SSLProxyEngine Off
   ProxyPreserveHost Off
  </IfModule>
</VirtualHost>

Now, I hide some information, which world can get from our Apache server. Add this directives to Apache configuration. Detailes can be read here.

vim /etc/httpd/conf/httpd.conf
ServerSignature Off
ServerTokens Prod

Some nice explanations of Proxy and WordPress behind it is here: https://community.pivotal.io/s/article/Purpose-of-the-X-Forwarded-Proto-HTTP-Header


Selinux problem

If we have enabled selinux (check like this):

# sestatus

SELinux status: enabled
SELinuxfs mount: /sys/fs/selinux
SELinux root directory: /etc/selinux
Loaded policy name: targeted
Current mode: enforcing
Mode from config file: enforcing
Policy MLS status: enabled
Policy deny_unknown status: allowed
Memory protection checking: actual (secure)
Max kernel policy version: 31

And we see some problems in our error log and the page is not loaded:

[Tue Aug 25 12:25:37.344072 2020] [proxy_http:error] [client xxx:xxx] AH01114: HTTP: failed to make connection to backend: 192.168.88.5

We can see this error at log:

sealert -a /var/log/audit/audit.log

Just allow selinux policy to Apache to can network connect via setsebool:

setsebool -P httpd_can_network_connect on

And that is.

Total Page Visits: 151226 - Today Page Visits: 20

Encrypted LVM partition on software raid-1 with mdadm

At another post https://www.gonscak.sk/?p=201 I posted how to create raid1 software raid with mdadm in linux. Now I tried to add a crypted filesystem to this.

First, check, that we have working software raid:

sudo mdadm --misc --detail /dev/md0

/dev/md0:
           Version : 1.2
     Creation Time : Wed Aug 22 09:34:23 2018
        Raid Level : raid1
        Array Size : 1953381440 (1862.89 GiB 2000.26 GB)
     Used Dev Size : 1953381440 (1862.89 GiB 2000.26 GB)
      Raid Devices : 2
     Total Devices : 2
       Persistence : Superblock is persistent
     Intent Bitmap : Internal
       Update Time : Thu Aug 23 14:18:50 2018
             State : active 
    Active Devices : 2
   Working Devices : 2
    Failed Devices : 0
     Spare Devices : 0
Consistency Policy : bitmap
              Name : gw36:0  (local to host gw36)
              UUID : ded4f30e:1cfb20cb:c10b843e:df19a8ff
            Events : 3481
    Number   Major   Minor   RaidDevice State
       0       8       17        0      active sync   /dev/sdb1
       1       8       33        1      active sync   /dev/sdc1

Now, we synced drives and clean. It is time to encrypt.  If we have not loaded modules for encryption, load it:q

modprobe dm-crypt

Now create the volume with passphrase:

sudo cryptsetup --cipher=aes-xts-plain --verify-passphrase --key-size=512 luksFormat /dev/md0

And we can open it:

sudo cryptsetup  luksOpen /dev/md0 cryptdisk

Now we can create as many times a physical volume, volume group and logical volume.

sudo pvcreate /dev/mapper/cryptdisk
sudo vgcreate raid1 /dev/mapper/cryptdisk
sudo lvcreate --size 500G --name lv-home raid1

sudo pvs
  PV                     VG        Fmt  Attr PSize    PFree
  /dev/mapper/cryptdisk  raid1     lvm2 a--    <1,82t 1,33t
sudo vgs
  VG        #PV #LV #SN Attr   VSize    VFree
  raid1       1   1   0 wz--n-   <1,82t 1,33t
sudo lvs
  LV      VG        Attr       LSize
  lv-home raid1     -wi-ao---- 500,00g            

Next, we create a filesystem on this logical volume:

sudo mkfs.ext4 /dev/mapper/raid1-lv--home

And we can mount it:

sudo mount /dev/mapper/raid1-lv--home crypt-home/

Now we have an encrypted partition (disk) for our home directory.

Total Page Visits: 151226 - Today Page Visits: 20

How to resize Physical volume and shrink disk partition

I Installed proxmox environment on Intel 240GB SSD. Installation take the whole disk for lvm. So I need to reduce the used space and create a new partition for drbd.
This is my disk. You can see, that the disk is full allocated with 171G free.

root@pve1:/# gdisk -l /dev/sda
Disk /dev/sda: 468862128 sectors, 223.6 GiB
Number Start (sector) End (sector) Size Code Name
 1      34          2047        1007.0  KiB EF02
 2      2048        262143      127.0   MiB EF00
 3      262144      111411199   53.0    GiB 8E00 Linux LVM
root@pve1:/# pvs
 PV VG Fmt Attr PSize PFree
 /dev/sda3 pve lvm2 a-- 223.44g 171.44g
root@pve1:/# vgs
 VG #PV #LV #SN Attr VSize VFree
 pve 1 3 0 wz--n- 223.44g 171.44g
root@pve1:/# lvs
 LV VG Attr LSize Pool Origin Data% Move Log Copy% Convert
 data pve -wi-ao--- 40.00g
 root pve -wi-ao--- 10.00g
 swap pve -wi-ao--- 2.00g

So, we list our logical volumes with segments on physical volume /dev/sda3:

root@pve1:/# pvs -v --segments /dev/sda3
 Using physical volume(s) on command line
 PV VG Fmt Attr PSize PFree Start SSize LV Start Type PE Ranges
 /dev/sda3 pve lvm2 a-- 223.44g 171.44g 0 512 swap 0 linear /dev/sda3:0-511
 /dev/sda3 pve lvm2 a-- 223.44g 171.44g 512 2560 root 0 linear /dev/sda3:512-3071
 /dev/sda3 pve lvm2 a-- 223.44g 171.44g 3072 10240 data 0 linear /dev/sda3:3072-13311
 /dev/sda3 pve lvm2 a-- 223.44g 171.44g 13312 43889 0 free

We can see, the size of PV is 223,44G and we have free 171,44G. So, we must shrink this physical volume about 171,44G. So compute the space for size of this physical volume: 223,44 – 171,44 = 52G. So, our PV must have at least 52G. Next, we resize this pv:

root@pve1:/# pvresize --setphysicalvolumesize 52G /dev/sda3
 /dev/sda3: cannot resize to 13311 extents as 13312 are allocated.
 0 physical volume(s) resized / 1 physical volume(s) not resized
root@pve1:/# pvresize --setphysicalvolumesize 52.1G /dev/sda3
 Physical volume "/dev/sda3" changed
 1 physical volume(s) resized / 0 physical volume(s) not resized

As we can see, we cannost shrink exact to this space. So we add 100M and use the 52,1G size. Now we can see:

root@pve1:/# pvs -v --segments /dev/sda3
 Using physical volume(s) on command line
 PV VG Fmt Attr PSize PFree Start SSize LV Start Type PE Ranges
 /dev/sda3 pve lvm2 a-- 52.10g 100.00m 0 512 swap 0 linear /dev/sda3:0-511
 /dev/sda3 pve lvm2 a-- 52.10g 100.00m 512 2560 root 0 linear /dev/sda3:512-3071
 /dev/sda3 pve lvm2 a-- 52.10g 100.00m 3072 10240 data 0 linear /dev/sda3:3072-13311
 /dev/sda3 pve lvm2 a-- 52.10g 100.00m 13312 25 0 free

At this point, we must work on the lowest layer of disk, so we must delete this partition and create a new one. The new partition must start on the same sector as previous and the last sector must be after last segment of physical volume. I use gdisk, because my disk have GPT partition table:

root@pve1:/# gdisk /dev/sda
Command (? for help): p
Disk /dev/sda: 468862128 sectors, 223.6 GiB
Logical sector size: 512 bytes
First usable sector is 34, last usable sector is 468862094
Number Start (sector) End (sector) Size Code Name
 1 34 2047 1007.0 KiB EF02
 2 2048 262143 127.0 MiB EF00
 3 262144 468862094 223.4 GiB 8E00
Command (? for help): d
Partition number (1-3): 3
Command (? for help): n
Partition number (3-128, default 3):
First sector (262144-468862094, default = 262144) or {+-}size{KMGTP}:
Last sector (262144-468862094, default = 468862094) or {+-}size{KMGTP}: +53G
Current type is 'Linux filesystem'
Hex code or GUID (L to show codes, Enter = 8300): 8E00
Changed type of partition to 'Linux LVM'
Command (? for help): p
Disk /dev/sda: 468862128 sectors, 223.6 GiB
Total free space is 357450895 sectors (170.4 GiB)
Number Start (sector) End (sector) Size         Code Name
 1     34             2047         1007.0 KiB   EF02
 2     2048           262143       127.0 MiB    EF00
 3     262144         111411199    53.0 GiB     8E00 Linux LVM
Command (? for help): w
Final checks complete. About to write GPT data. THIS WILL OVERWRITE EXISTING
PARTITIONS!!
Do you want to proceed? (Y/N): y
OK; writing new GUID partition table (GPT) to /dev/sda.
Warning: The kernel is still using the old partition table.
The new table will be used at the next reboot.
The operation has completed successfully.

Now, we must reboot our computer to use new partition table. And after reboot, use this command to resize physical volume on partition /dev/sda3

root@pve1:/# pvresize /dev/sda3
 Physical volume "/dev/sda3" changed
 1 physical volume(s) resized / 0 physical volume(s) not resized
root@pve1:/# pvs
 PV VG Fmt Attr PSize PFree
 /dev/sda3 pve lvm2 a-- 53.00g 1020.00m

Now, if we can use all of free space for the logical volume “data”, we can resize it to whole free space, like this:

root@pve1:/# lvresize /dev/pve/data -l +100%FREE
 Extending logical volume data to 41.00 GiB
 Logical volume data successfully resized
 root@pve1:/# lvs
 LV VG Attr LSize Pool Origin Data% Move Log Copy% Convert
 data pve -wi-ao--- 41.00g
 root pve -wi-ao--- 10.00g
 swap pve -wi-ao--- 2.00g
root@pve1:/# pvs
 PV VG Fmt Attr PSize PFree
 /dev/sda3 pve lvm2 a-- 53.00g 0

Now, we can create a new partition at the end of disk:

gdisk /dev/sda
Command (? for help): p
Disk /dev/sda: 468862128 sectors, 223.6 GiB
Logical sector size: 512 bytes
Number Start (sector) End (sector) Size Code Name
 1 34 2047 1007.0 KiB EF02
 2 2048 262143 127.0 MiB EF00
 3 262144 111411199 53.0 GiB 8E00 Linux LVM
Command (? for help): n
Partition number (4-128, default 4):
First sector (111411200-468862094, default = 111411200) or {+-}size{KMGTP}:
Last sector (111411200-468862094, default = 468862094) or {+-}size{KMGTP}:
Current type is 'Linux filesystem'
Hex code or GUID (L to show codes, Enter = 8300):
Changed type of partition to 'Linux filesystem'
Command (? for help): w
Final checks complete. About to write GPT data. THIS WILL OVERWRITE EXISTING
PARTITIONS!!
Do you want to proceed? (Y/N): y
OK; writing new GUID partition table (GPT) to /dev/sda.
Warning: The kernel is still using the old partition table.
The new table will be used at the next reboot.
The operation has completed successfully.
root@pve1:~# gdisk -l /dev/sda
Number Start (sector) End (sector) Size         Code Name
 1     34             2047         1007.0 KiB   EF02
 2     2048           262143       127.0 MiB    EF00
 3     262144         111411199    53.0 GiB     8E00 Linux LVM
 4     111411200      468862094    170.4 GiB    8300 Linux filesystem

And if we list details about physical volume, we can see, that there is no free space:

root@pve1:~# pvs -v --segments /dev/sda3
 Using physical volume(s) on command line
 PV VG Fmt Attr PSize PFree Start SSize LV Start Type PE Ranges
 /dev/sda3 pve lvm2 a-- 53.00g 0 0 512 swap 0 linear /dev/sda3:0-511
 /dev/sda3 pve lvm2 a-- 53.00g 0 512 2560 root 0 linear /dev/sda3:512-3071
 /dev/sda3 pve lvm2 a-- 53.00g 0 3072 10495 data 0 linear /dev/sda3:3072-13566

And what is drbd, you can see in another post on my page. Have a fun.

Total Page Visits: 151226 - Today Page Visits: 20

How to create software raid 10 with mdadm

RAID 10, also called as RAID 1+0 is a stripe of mirrors. It require  four disks at least. It stripes data across mirrored pairs. So, as long as one disk in each mirrored pair is functional, data can be retrieved. If two disks in the same mirrored pair fail, all data will be lost, because there is no parity.

Raid 10 provides redundancy and performance despite of 50% capacity of disks.
Note on why to use different manufacturers disks: Disks will fail, this is not a matter of a “if” but a “when”. Disks of the same manufacturer and the same model have similar properties, and so, higher chances of failing together under the same conditions and time of use. The suggestion so is to use disks from different manufacturers, different models and, in special, that do not belong to the same batch (consider buying from different stores if you are buying disks of the same manufacturer and model). This is not uncommon that a second disk fail happen during a resotre after a disk replacement when disks of the same batch are used. You certainly don’t want this to happen to you.
So we have four disk fo this: /dev/sdc, /dev/sdd, /dev/sde, /dev/sdf. At first, we check, if there is any previous md superblock. So we examine this disks:

 mdadm -E /dev/sd[c-f]
/dev/sdc:
 MBR Magic : aa55
/dev/sdd:
 MBR Magic : aa55
/dev/sde:
 MBR Magic : aa55
/dev/sdf:
 MBR Magic : aa55

Now, we must clear this mbr (512b):

dd if=/dev/zero of=/dev/sdc bs=512 count=1
512 bytes copied, 0.000379187 s, 1.4 MB/s
dd if=/dev/zero of=/dev/sdd bs=512 count=1
512 bytes copied, 0.000251414 s, 2.0 MB/s
dd if=/dev/zero of=/dev/sde bs=512 count=1
512 bytes copied, 0.000487665 s, 1.0 MB/s
dd if=/dev/zero of=/dev/sdf bs=512 count=1
512 bytes copied, 0.000436107 s, 1.2 MB/s

And now, we can see, that there is no superblock:

mdadm -E /dev/sd[c-f]
mdadm: No md superblock detected on /dev/sdc.
mdadm: No md superblock detected on /dev/sdd.
mdadm: No md superblock detected on /dev/sde.
mdadm: No md superblock detected on /dev/sdf.

Now, we must create a partitions with the same size. Disks from different manufacturers (or even different models of the “same” capacity from the same manufacturer) don’t necessarily have the exact same disk size. And in future, we can replace failed disk with another disk (maybe a bigger), but we must create partition with the same size.
So, list the disks size:

fdisk -l /dev/sd[c-f]
Disk /dev/sdc: 465.8 GiB, 500107862016 bytes, 976773168 sectors
Units: sectors of 1 * 512 = 512 bytes
Sector size (logical/physical): 512 bytes / 512 bytes
I/O size (minimum/optimal): 512 bytes / 512 bytes
Disk /dev/sdd: 465.8 GiB, 500107862016 bytes, 976773168 sectors
Units: sectors of 1 * 512 = 512 bytes
Sector size (logical/physical): 512 bytes / 512 bytes
I/O size (minimum/optimal): 512 bytes / 512 bytes
Disk /dev/sde: 465.8 GiB, 500107862016 bytes, 976773168 sectors
Units: sectors of 1 * 512 = 512 bytes
Sector size (logical/physical): 512 bytes / 4096 bytes
I/O size (minimum/optimal): 4096 bytes / 4096 bytes
Disk /dev/sdf: 465.8 GiB, 500107862016 bytes, 976773168 sectors
Units: sectors of 1 * 512 = 512 bytes
Sector size (logical/physical): 512 bytes / 512 bytes
I/O size (minimum/optimal): 512 bytes / 512 bytes

We can create partitions with fdisk command. Create a new primary partition with the same sectors:

fdisk -l /dev/sd[c-f]
Disk /dev/sdc: 465.8 GiB, 500107862016 bytes, 976773168 sectors
/dev/sdc1 2048 976773167 976771120 465.8G 83 Linux
Disk /dev/sdd: 465.8 GiB, 500107862016 bytes, 976773168 sectors
/dev/sdd1 2048 976773167 976771120 465.8G 83 Linux
Disk /dev/sde: 465.8 GiB, 500107862016 bytes, 976773168 sectors
/dev/sde1 2048 976773167 976771120 465.8G 83 Linux
Disk /dev/sdf: 465.8 GiB, 500107862016 bytes, 976773168 sectors
/dev/sdf1 2048 976773167 976771120 465.8G 83 Linux

For sure, check, if there is no magic block in partitions:

mdadm -E /dev/sd[c-f]1
mdadm: No md superblock detected on /dev/sdc1.
/dev/sdd1:
 MBR Magic : aa55
Partition[0] : 1836016416 sectors at 1936269394 (type 4f)
Partition[1] : 544437093 sectors at 1917848077 (type 73)
Partition[2] : 544175136 sectors at 1818575915 (type 2b)
Partition[3] : 54974 sectors at 2844524554 (type 61)
mdadm: No md superblock detected on /dev/sde1.
mdadm: No md superblock detected on /dev/sdf1.

So, clear this superblock:

dd if=/dev/zero of=/dev/sdd1 bs=512 count=1
512 bytes copied, 0.000261033 s, 2.0 MB/s

And check for the last time:

mdadm -E /dev/sd[c-f]1
mdadm: No md superblock detected on /dev/sdc1.
mdadm: No md superblock detected on /dev/sdd1.
mdadm: No md superblock detected on /dev/sde1.
mdadm: No md superblock detected on /dev/sdf1.

And finally we create a raid array:

mdadm --create /dev/md1 --level=10 --raid-devices=4 /dev/sd[c-f]1
mdadm: Defaulting to version 1.2 metadata
mdadm: array /dev/md1 started.

Check the status of initial synchronization:

cat /proc/mdstat
Personalities : [raid1] [linear] [multipath] [raid0] [raid6] [raid5] [raid4] [raid10]
md1 : active raid10 sdf1[3] sde1[2] sdd1[1] sdc1[0]
 976508928 blocks super 1.2 512K chunks 2 near-copies [4/4] [UUUU]
 [>....................] resync = 0.2% (2810176/976508928) finish=138.5min speed=117090K/sec
 bitmap: 8/8 pages [32KB], 65536KB chunk


Total Page Visits: 151226 - Today Page Visits: 20

disk cloning with dd

How to create a disk or usb image, and compress it on the fly? And how to restore it?
I have own operating system on USB key. To create a full-backup and then possible restore to another device, I use linux command dd (dd – convert and copy a file).
Now, we must determine, on which patch we have s source disk. I my case, it is

sudo fdisk -l /dev/sdb
Disk /dev/sdb: 29,5 GiB

First, I install additional  software for monitoring and best compressing on more cores

sudo apt-get install pigz pv

Then, I create a full copy of the usb key. Without compression it takes 30GB, with compression, it take only 3GB. With command “pv” we can watch progress. Pigz compress the source image with multiple threads and cores. With parameter -c it writes all processed output to stdout. So  with operand “>” we write this pigz output to a file:

sudo dd if=/dev/sdb | pv | pigz -c > /home/vasil/Documents/corsair-work.dd.gz

If we had som bad blocks on source disk, and we want to clone it anyway, we can use another conv options. Like:

conv=sync,noerror

This means:

  • noerror – This makes use dd continue even after a read error is encountered;
  • sync – This option has sense especially when used together with noerror.

In such a case the noerror option will make dd continue running even if it a sector cannot be read successfully, and the sync option will make so that the amount of data failed to be read its replaced by NULs, so that the length of the data is preserved even if the actual data is lost (since it’s not possible to read it).

Then, I remove the source usb key and insert new one. It also has a path /dev/sdb. Now, I restore it with this command:

pigz -cdk Documents/corsair-work.dd.gz |pv| sudo dd of=/dev/sdb bs=4M

Parameter -c also write output to stdout and program dd writes it to disk. Parameter -k menas, that keep original file after decompress. And parameter -d means decompress.
Now, we can boot system with new usb key. And this image is identical as the source.
I hope, that this help someone. Have a nice day.

Total Page Visits: 151226 - Today Page Visits: 20

Bareos on Centos 7 – powerful backup tool

Today I met with backup problem. I nee to find and set up solution for backup and possible restore of files in windows or linux. I heard about bacula, but after som searching and reading, I choose a new fork of bacula – bareos.

Installing Bareos itself

So I install it on new, clean vm centos 7. At first define a hostname:

hostnamectl set-hostname bareos-ba

Next, add a bareos repository:

cd /etc/yum.repos.d/
wget http://download.bareos.org/bareos/release/latest/CentOS_7/bareos.repo
yum install bareos -y

Next, we can use MariaDB-server for backend od bareos:

yum install mariadb-server -y
systemctl start mariadb.service
systemctl enable mariadb.servic

Now, we create and mount a file-storage, when bareos will save the data:

fdisk /dev/vda
...
mkfs.xfs /dev/vda1
mkdir /var/backups
mount /dev/vda1 /var/backups/
chown bareos:bareos -R /var/backups/
df -h
...
Filesystem                  Size  Used Avail Use% Mounted on
/dev/vda1                    32G   33M   32G   1% /var/backups

Edit /etc/fstab to make this mount permanent.
Now, we can create a new bareos database with pre-defined scripts:

[root@bareos-ba]#/usr/lib/bareos/scripts/create_bareos_database
Creating mysql database
Creating of bareos database succeeded.
[root@bareos-ba]# /usr/lib/bareos/scripts/make_bareos_tables
Making mysql tables
Creation of Bareos MySQL tables succeeded.
[root@bareos-ba]# /usr/lib/bareos/scripts/grant_bareos_privileges
Granting mysql tables
Privileges for user bareos granted ON database bareos.

Now, we can check our default configuration with:

su bareos -s /bin/sh -c "/usr/sbin/bareos-dir -t"
su bareos -s /bin/sh -c "/usr/sbin/bareos-sd -t"
bareos-fd -t

If you are using firewall, for bareos server open this ports:

firewall-cmd --zone=public --add-port=9101/tcp --permanent
firewall-cmd --zone=public --add-port=9102/tcp --permanent
firewall-cmd --zone=public --add-port=9103/tcp --permanent
#http only if you want web-gui for baores
firewall-cmd --zone=public --add-service=http --permanent
firewall-cmd --reload
firewall-cmd --list-all
#public (active)
# - services: http ssh
# - ports: 5666/tcp 9103/tcp 9101/tcp 161/udp 9102/tcp

This step is only for bareos WebUI. If you don’t need this, skip it.

yum install bareos-webui -y
setsebool -P httpd_can_network_connect on
systemctl start httpd.service
systemctl enable httpd.service

Edit conf file and set FQDN for this host:

vim /etc/bareos-webui/directors.ini
- diraddress = "bareos-ba.example.com"

Copy example admin console config:

cp /etc/bareos/bareos-dir.d/console/admin.conf.example /etc/bareos/bareos-dir.d/console/admin.conf
chown bareos:bareos /etc/bareos/bareos-dir.d/console/admin.conf

Setting up a storage for bareos director

At first, we must add our previously created and mounted disk to our bareos-storage daemon and then add it to bareos-director daemon for using it and working.

cp /etc/bareos/bareos-sd.d/device/FileStorage.conf /etc/bareos/bareos-sd.d/device/backups.conf
chown bareos:bareos /etc/bareos/bareos-sd.d/device/backups.conf
vim /etc/bareos/bareos-sd.d/device/backups.conf
 - change archive device and the name:
Archive Device = /var/backups
Name = Backups
cp /etc/bareos/bareos-dir.d/storage/File.conf /etc/bareos/bareos-dir.d/storage/backups.conf
chown bareos:bareos /etc/bareos/bareos-dir.d/storage/backups.conf
vim /etc/bareos/bareos-dir.d/storage/backups.conf
 - change Name and Device. Name must be the same as above:
Name = Backups
Device = Backups

Now we edit job definitions:

vim /etc/bareos/bareos-dir.d/jobdefs/DefaultJob.conf
 - change Storage variable to ours above mentioned:
Storage = Backups

Now again check bareos config files for error:

su bareos -s /bin/sh -c "/usr/sbin/bareos-dir -t"
su bareos -s /bin/sh -c "/usr/sbin/bareos-sd -t"
bareos-fd -t

and restart (start) bareos:

service bareos-dir restart
service bareos-sd restart
service bareos-fd restart
systemctl enable bareos-dir.service
systemctl enable bareos-sd.service
systemctl enable bareos-fd.service

Using bconsole and WEBui

Our webui is on address bellow. Default login nad pass is: admin/admin

http://bareos-ba.globesy.sk/bareos-webui/

Our bareos console is avalaible via command bconsole:

[root@bareos-ba ~]# bconsole
Connecting to Director localhost:9101
1000 OK: bareos-dir Version: 16.2.4 (01 July 2016)
Enter a period to cancel a command.
*

bconsole is marked at the beginning with asterisk *
Some useful commands:

list storages
Automatically selected Catalog: MyCatalog
Using Catalog "MyCatalog"
+-----------+---------+-------------+
| StorageId | Name    | AutoChanger |
+-----------+---------+-------------+
|         1 | File    |           0 |
|         2 | Backups |           0 |
+-----------+---------+-------------+
list pools
show jobdefs
show filesets
status dir
status client=bareos-fd

Now we can start our first job – Selftest. So, run bconsole and continue:

bconsole
*run
- select job resource 3: backup-bareos-fs
- yes => Job queued. JobId=1
*wait jobid=1
*messages
quit

In messages we can see, that bareos backup almost 44MB of files. In our fileset of this Selftest, we can see bareos backup folder /usb/sbin:

cat /etc/bareos/bareos-dir.d/fileset/SelfTest.conf

Now, we can restore this files. By default job of restore, it will be restored to /tmp/bareos-restores:

 cat /etc/bareos/bareos-dir.d/job/RestoreFiles.conf

Run bconsole:

*restore all client=bareos-fd
- select 5 for most recent backup
- done
- yes
Job queued. JobId=2
*wait jobid=2
*messages
..

We can see our restored files in /tmp/bareos-restores/.
 

Total Page Visits: 151226 - Today Page Visits: 20

How to install nextcloud on centos 7 minimal

At first, please update your centos. Every command I use, is used as root 😉

yum -y update

Installing database server MariaDB

Next, we install and create empty database for our nextcloud. Then we start it and enable for autostart after boot.
If you wish, you can skip installations of MariaDB and you can use built-in SQLite. Then you can continue with installing apache web server.

yum -y install mariadb mariadb-server
...
systemctl start mariadb
systemctl enable mariadb

Now, we run post installation script to finish setting up mariaDB server:

mysql_secure_installation
...
Enter current password for root (enter for none): ENTER
Set root password? [Y/n] Y
Remove anonymous users? [Y/n] Y
Disallow root login remotely? [Y/n] Y
Remove test database and access to it? [Y/n] Y
Reload privilege tables now? [Y/n] Y

Now, we can create a database for nextcloud.

mysql -u root -p
...
CREATE DATABASE nextcloud;
GRANT ALL PRIVILEGES ON nextcloud.* TO 'nextclouduser'@'localhost' IDENTIFIED BY 'YOURPASSWORD';
FLUSH PRIVILEGES;
exit;

Installing Apache Web Server with ssl (letsencrypt)

Now, we install Apache web server, and we start it and enable for autostart after boot:

yum install httpd -y
systemctl start httpd.service
systemctl enable httpd.service

Now, we install ssl for apache and allow https service for firewall:

yum -y install epel-release
yum -y install httpd mod_ssl
...
firewall-cmd --zone=public --permanent --add-service=https
firewall-cmd --zone=public --permanent --add-service=http
firewall-cmd --reload
systemctl restart httpd.service
systemctl status httpd

Now we can access our server via https://out.server.sk
If we want signed certificate from letsencrypt, we can do it with next commands. Certboot will ask some questions, so answer them.

yum -y install python-certbot-apache
certbot --apache -d example.com

If we are good, we can see:

IMPORTANT NOTES:
 - Congratulations! Your certificate and chain have been saved at
   /etc/letsencrypt/live/example.com/fullchain.pem.
...

And we can test our page with this:

https://www.ssllabs.com/ssltest/analyze.html?d=example.com&latest

Install PHP 7

As creators of nextcloud recommends at minimal PHP 5.4, I use php 7.
PHP 5.4 has been end-of-life since September 2015 and is no longer supported by the PHP team. RHEL 7 still ships with PHP 5.4, and Red Hat supports it. Nextcloud also supports PHP 5.4, so upgrading is not required. However, it is highly recommended to upgrade to PHP 5.5+ for best security and performance.
Now we must add some additional repositories:

rpm -Uvh https://dl.fedoraproject.org/pub/epel/epel-release-latest-7.noarch.rpm
rpm -Uvh https://mirror.webtatic.com/yum/el7/webtatic-release.rpm

And we can install php 7.2:

yum install mod_php72w.x86_64 php72w-common.x86_64 php72w-gd.x86_64 php72w-intl.x86_64 php72w-mysql.x86_64 php72w-xml.x86_64 php72w-mbstring.x86_64 php72w-cli.x86_64 php72w-process.x86_64

Check in:

php --ini |grep Loaded
Loaded Configuration File:         /etc/php.ini
php -v
PHP 7.2.22 (cli) (built: Sep 11 2019 18:11:52) ( NTS )
Copyright (c) 1997-2018 The PHP Group
Zend Engine v3.2.0, Copyright (c) 1998-2018 Zend Technologies

In my case, I will use nextcloud as my backup device, so I increase the default upload limit to 200MB.

sed -i "s/post_max_size = 8M/post_max_size = 200M/" /etc/php.ini
sed -i "s/upload_max_filesize = 2M/upload_max_filesize = 200M/" /etc/php.ini
sed -i "s/memory_limit = 128M/memory_limit = 512M/" /etc/php.ini

Restart web server:

systemctl restart httpd

Installing Nextcloud

At first, I install wget tool for download and unzip:

 yum -y install wget unzip

Now we can download nextcloud (at this time the latest version is 16.0.4). And extract it from archive to final destination. Then we change ownership of this directory:

wget https://download.nextcloud.com/server/releases/nextcloud-16.0.4.zip
...
unzip nextcloud-16.0.4.zip -d /var/www/html/
...
chown -R apache:apache /var/www/html/nextcloud/

Check, if you have enabled SELinux by command sestatus:

sestatus 

SELinux status:                 enabled
SELinuxfs mount:                /sys/fs/selinux
SELinux root directory:         /etc/selinux
Loaded policy name:             targeted
Current mode:                   enforcing
Mode from config file:          enforcing
Policy MLS status:              enabled
Policy deny_unknown status:     allowed
Max kernel policy version:      31

Refer to nextcloud admin manual, you can run into permissions problems. Run these commands as root to adjust permissions:

semanage fcontext -a -t httpd_sys_rw_content_t '/var/www/html/nextcloud/data(/.*)?'
semanage fcontext -a -t httpd_sys_rw_content_t '/var/www/html/nextcloud/config(/.*)?'
semanage fcontext -a -t httpd_sys_rw_content_t '/var/www/html/nextcloud/apps(/.*)?'
semanage fcontext -a -t httpd_sys_rw_content_t '/var/www/html/nextcloud/.htaccess'
semanage fcontext -a -t httpd_sys_rw_content_t '/var/www/html/nextcloud/.user.ini'
restorecon -Rv '/var/www/html/nextcloud/'

If you see error “-bash: semanage: command not found”, install packages:

yum provides /usr/sbin/semanage
yum install policycoreutils-python-2.5-33.el7.x86_64

And finally, we can access our nextcloud and set up administrators password via our web: https://you-ip/nextcloud
Now you must complete the installation via web interface. Set Administrator’s password and locate to MariaDB with used credentials:

Database user: nextclouduser
Database password: YOURPASSWORD
Database name: nextcloud
host: localhost

In my case, I must create a DATA folder under out nextcloud and set permissions:

mkdir /var/www/html/nextcloud/data
chown apache:apache /var/www/html/nextcloud/data -R
semanage fcontext -a -t httpd_sys_rw_content_t '/var/www/html/nextcloud/data(/.*)?'
restorecon -Rv '/var/www/html/nextcloud/'

For easier access, I created a permanent redirect for my IP/domain Nextcloud root folder. This redirect allow you to open page

https://your-ip

and redirect you to:

https://your-ip/nextcloud

You must edit httpd.conf file and add this line into directory /var/www/html:

vim /etc/httpd/conf/httpd.conf
...
RedirectMatch ^/$ https://your-ip/nextcloud
...
systemctl restart httpd.service

If we see an error like “Your data directory and files are probably accessible from the Internet. The .htaccess file is not working. ” try edit and change variable

vim /etc/httpd/conf/httpd.conf
....
<Directory "/var/www/html">
    AllowOverride All
    Require all granted
    Options Indexes FollowSymLinks
</Directory>

Enable updates via the web interface

To enable updates via the web interface, you may need this to enable writing to the directories:

setsebool httpd_unified on

When the update is completed, disable write access:

setsebool -P httpd_unified off

Disallow write access to the whole web directory

For security reasons it’s suggested to disable write access to all folders in /var/www/ (default):

setsebool -P  httpd_unified  off

A way to enable enhanced security with own configuration file

vim  /etc/httpd/conf.d/owncloud.conf
...
Alias /nextcloud "/var/www/html/nextcloud/"
<Directory /var/www/html/nextcloud/>
  Options +FollowSymlinks
  AllowOverride All
 <IfModule mod_dav.c>
  Dav off
 </IfModule>
 SetEnv HOME /var/www/html/nextcloud
 SetEnv HTTP_HOME /var/www/html/nextcloud
</Directory>
Total Page Visits: 151226 - Today Page Visits: 20

How to resize virtualbox fixed vdi storage to dynamic or fixed larger file

This short post show you, how to resize small vhd/vdi file to one bigger file. And this bigger file can be dynamic or fixed size on hard drive. I working on SSD disk, so it is very fast 🙂 I use comnad line in windows (start > run > cmd). And enter into virtualbox directory:

C:\Users\user>cd c:\
c:\>cd "Program Files\Oracle\VirtualBox"\

So, the input file is “e:\virtual_small.vhd” :

c:\Program Files\Oracle\VirtualBox>VBoxManage.exe showhdinfo e:\virtual_small.vhd
UUID:           617f112b-dac5-4e96-b435-437203992efa
Parent UUID:    base
State:          created
Type:           normal (base)
Location:       e:\virtual_small.vhd
Storage format: VHD
Format variant: fixed default
Capacity:       15360 MBytes
Size on disk:   15360 MBytes
Encryption:     disabled

So, input file is small and we want larger. We must clone it into new one file, dynamically allocated:

c:\Program Files\Oracle\VirtualBox>VBoxManage.exe clonehd e:\virtual_small.vhd e:\virtual_dyn.vhd
0%...10%...20%...30%...40%...50%...60%...70%...80%...90%...100%
Clone medium created in format 'VHD'. UUID: b48eebd1-daa5-4020-9774-d5ca4b985b45
c:\Program Files\Oracle\VirtualBox>VBoxManage.exe showhdinfo e:\virtual_dyn.vhd
UUID:           b48eebd1-daa5-4020-9774-d5ca4b985b45
Parent UUID:    base
State:          created
Type:           normal (base)
Location:       e:\virtual_dyn.vhd
Storage format: VHD
Format variant: dynamic default
Capacity:       15360 MBytes
Size on disk:   15245 MBytes
Encryption:     disable

Now, we can resize it to new size, perhaps 25000MB:

c:\Program Files\Oracle\VirtualBox>VBoxManage.exe modifyhd e:\virtual_dyn.vhd --resize 25000
0%...10%...20%...30%...40%...50%...60%...70%...80%...90%...100%
c:\Program Files\Oracle\VirtualBox>VBoxManage.exe showhdinfo e:\virtual_dyn.vhd
UUID:           fe1c2a26-39d4-4f31-b4da-bc688b4a3c22
Parent UUID:    base
State:          created
Type:           normal (base)
Location:       e:\virtual_dyn.vhd
Storage format: VHD
Format variant: dynamic default
Capacity:       25000 MBytes
Size on disk:   15247 MBytes
Encryption:     disabled

And now, we can clone it into fixed size. Fixed size of this disk is better for performance on classic disk. Dynamic is better on SSD disks, because there is never-ending resize of this file and virtualbox must allocate new space if the virtual machine grows in lifetime. So dynamic file allocate its space at the beginning. It ok for me, because I don’t care about the space of this file on beginning.

c:\Program Files\Oracle\VirtualBox>VBoxManage.exe clonehd e:\virtual_dyn.vhd e:\virtual_static.vhd --variant Fixed
0%...10%...20%...30%...40%...50%...60%...70%...80%...90%...100%
Clone medium created in format 'VHD'. UUID: 3ddb4a53-a767-478f-8dc7-f670610320ca
c:\Program Files\Oracle\VirtualBox>VBoxManage.exe showhdinfo e:\virtual_static.vhd
UUID:           3ddb4a53-a767-478f-8dc7-f670610320ca
Parent UUID:    base
State:          created
Type:           normal (base)
Location:       e:\virtual_static.vhd
Storage format: VHD
Format variant: fixed default
Capacity:       25000 MBytes
Size on disk:   25000 MBytes
Encryption:     disabled

Have a nice day.

Total Page Visits: 151226 - Today Page Visits: 20

Setting up logrotate on Centos 7

Yesterday, I met with problem of low capacity /var/log/ partition. Some logs were too big and logrotate is the perfect tool to handle this problem. It is a software designed for reduce amount of space for every log file we have. And it can be done with some ways.
Logrotate Description: logrotate  is  designed  to  ease  administration of systems that generate large numbers of log files.  It allows automatic rotation, compression, removal, and mailing of log files.  Each log file may be handled daily, weekly, monthly, or when  it  grows too large.
Normally,  logrotate  is  run as a daily cron job.  It will not modify a log multiple times in one day So in few words, logrotate is reducing space usage on disk by log files.

Logrotate configuration

Configuration of logrotate is made in one main file: /etc/logrotate.conf and other service specific configuration files which are stored in /etc/logrotate.d/
So main sample configuration is:

# see "man logrotate" for details
# rotate log files weekly specified in /etc/logrotate.d/
weekly
# keep 4 weeks of all log files
rotate 4
# create new (empty) log files after rotating old ones
create
# use date as a suffix of the rotated file
dateext
# uncomment this if you want your log files compressed by gzip
compress
# RPM packages drop log rotation information into this directory
#there are all other configurations of services and their logs to rotate
include /etc/logrotate.d

Some samples and real log files configurations

So, we can add a new logs file into /var/log/  by this way:

echo "this is a sample log file" > /var/log/vasil.log
#this create a log file vasil1.log of size 5MB
dd if=/dev/zero of=/var/log/vasil1.log bs=1M count=5

Next, we create a new configuration files which are stored in destination explained above:

vim /etc/logrotate.d/vasil
###
/var/log/vasil.log {
 missingok
 notifempty
 compress
 minsize 1M
 daily
 create 0600 root root
}
vim /etc/logrotate.d/vasil1
###
/var/log/vasil1.log {
 missingok
 notifempty
 compress
 minsize 1M
 daily
 create 0600 root root
}

And som explanation of variables:

  • missingok – do not output error if logfile is missing
  • notifempty – do not rotate log file if it is empty
  • compress – Old versions of log files are compressed with gzip by default
  • minsize – Log file is rotated only if it is bigger than 1M
  • daily – ensures daily rotation
  • create – creates a new log file with permissions 600 where owner and group is root user

If you want more options and their explanation, look into manual:

man logrotare

Look at list of /var/log for our log files. We can see, that we have one log vasil.log with size 26b and vasil1.log with size 5MB.

ls -lah /var/log/va*
-rw-r--r--. 1 root root 5.0M Mar  3 13:21 /var/log/vasil1.log
-rw-r--r--. 1 root root   26 Mar  3 13:21 /var/log/vasil.log

Now, we can debug our configuration via this command:

logrotate -d /etc/logrotate.d/vasil1
or
logrotate -d /etc/logrotate.d/vasil

So, if we want to run logrotate manualy and see, what is happend, run the following command. But be aware because it rotate all your logs, defined in /etc/logrotate.d/

logrotate -f /etc/logrotate.conf

And we can see both log files compressed and two new empty log files created:

 ls -lah /var/log/va*
-rw-------. 1 root root    0 Mar  3 13:23 /var/log/vasil1.log
-rw-r--r--. 1 root root 5.0K Mar  3 13:21 /var/log/vasil1.log-20170303.gz
-rw-------. 1 root root    0 Mar  3 13:23 /var/log/vasil.log
-rw-r--r--. 1 root root   44 Mar  3 13:21 /var/log/vasil.log-20170303.gz

We can look into our compressed log file by this command:

zcat /var/log/vasil.log-20170303.gz
this is a sample log file

Or we can use gunzip to uncompress them by command gzip.
When we use logrotate, sometimes we need restart an application or service. Logrotate can do that by script called “postrotate”. This script can be used in configuration file like httpd. When log are rotated,  script reload service to use new empty log file.

cat /etc/logrotate.d/httpd
/var/log/httpd/*log {
    missingok
    notifempty
    sharedscripts
    delaycompress
    postrotate
        /bin/systemctl reload httpd.service > /dev/null 2>/dev/null || true
    endscript
}

So I hope, that this how to helps somebody 🙂 Have a fun.

Total Page Visits: 151226 - Today Page Visits: 20

How to install samba server on centos 7 with and without user and password

First, we must install package samba and accept all dependencies.

yum install samba -y

Create user, who can access our samba secure folder:

useradd -s /sbin/nologin user
groupadd smbgroup
usermod -a -G smbgroup user
smbpasswd -a user

Then, create a directories for samba shares. Chcon command mark our directory with label, that SELinux allows samba service to operate with this folder. Another possibility is disable SELinux, but it is not the right way 🙂

#for anonymous
mkdir -p /mnt/aaa
chmod -R 0777 /mnt/aaa
chcon -t samba_share_t /mnt/aaa -R
chown -R nobody:nobody /mnt/aaa
#for another secure user
mkdir -p /mnt/nfs/kadeco/
chmod -R 0755 /mnt/nfs/kadeco/
chcon -t samba_share_t /mnt/nfs/kadeco/ -R
chown -R user:smbgroup /mnt/nfs/kadeco/
restorecon -R /mnt/nfs/kadeco/

Edit samba config for ours anonymous and secure shares

vi /etc/samba/smb.conf
[global]
 workgroup = home
 security = user
 passdb backend = tdbsam
 printing = cups
 printcap name = cups
 load printers = yes
 cups options = raw
 map to guest = bad user
[Anonymous-aaa]
        path = /mnt/aaa
        writable = yes
        browsable = yes
        guest ok = yes
        create mode = 0777
        directory mode = 0777
[kadeco]
        path = /mnt/nfs/kadeco
        writable = yes
        browsable = yes
        guest ok = no
        valid users = user
        create mask = 0755
        directory mask = 0755
        read only = No

Now, we can see our configuration of samba by this command and test it for errors:

testparm

Next, if we use firewall, we must add some ports, or service for samba to allow:

firewall-cmd --permanent --zone=public --add-port=137/tcp
firewall-cmd --permanent --zone=public --add-port=138/tcp
firewall-cmd --permanent --zone=public --add-port=139/tcp
firewall-cmd --permanent --zone=public --add-port=445/tcp
firewall-cmd --permanent --zone=public --add-port=901/tcp
firewall-cmd --reload
or we can use simple:
firewall-cmd --permanent --zone=public --add-service=samba
firewall-cmd --reload

And finally, start samba services and enable it, after reboot.

systemctl start smb.service
systemctl start nmb.service
systemctl enable smb.service
systemctl enable nmb.service

A way to restart samba services:

systemctl restart smb
systemctl restart nmb

And now we can use our samba server. Anonymous folder, or secured folder 🙂

If you want to access some folder for read from apache, just made a selinux modify:

Allow samba read/write access everywhere:

setsebool -P samba_export_all_rw 1
or if you want to be a little more descrite about it:
chcon -t public_content_rw_t /mnt/nfs/kadeco
2) setsebool -P allow_smbd_anon_write 1
3) setsebool -P allow_httpd_anon_write 1

This should allow both Samaba and Apache write access to public_content_rw_t context.

Status of samba we can list by this commands:

smbstatus -p
- show list of samba processes
smbstatus -S
- show samba shares
smbstatus -L
- show samba locks

If we need restart samba process, or restart server, we can list locked files by “smbstatus -L”. We can see, which share is locked and which specific file is accessing.

Have fun

Total Page Visits: 151226 - Today Page Visits: 20

How to set up nfs server on centos 7/8, and display content via httpd

Sometimes I need to use fast, simple and no-password storage over the network in bash, or an ISO storage for Xenserver. So nfs sharing is the best way for this.  I have a linux machine with centos 7 and available storage of 1,5TB disk. So, prepare the disk:

fdisk -l /dev/xvdb
> n (new partition), and use default options. The use -t (change partition ID) and change it to 83 (Linux). The use -w (write)
reboot
mkfs.xfs /dev/xvdb1
mkdir /mnt/nfs
mount /dev/xvdb1 /mnt/nfs/

If everything is OK, edit /etc/fstab to automount this partition to ours folder, and add this line:

/dev/xvdb1 /mnt/nfs xfs defaults,nosuid,noatime,nodiratime 0 0

The install package nfs-utils, for nfs server:

yum -y install nfs-utils

And allow nfs service in firewalld:

firewall-cmd --permanent --zone=public --add-service=nfs
firewall-cmd --reload
#if sometimes on clients don't working showmount, and it create an error:
showmount -e 11.22.33.44
rpc mount export: RPC: Unable to receive; errno = No route to host
#we must add another ports to firewall:
firewall-cmd --permanent --zone=public --add-service=rpc-bind firewall-cmd --permanent --zone=public --add-service=mountd
firewall-cmd --reload

And uncoment this lines in: /etc/sysconfig/nfs (this is no applicable at Centos 8)

MOUNTD_PORT=892
STATD_PORT=662

Now enable nfs-server to run after poweron server and start it:

systemctl enable nfs-server.service
systemctl start nfs-server.service

Now we must prepare this folder with this permissions, for read and write for everybody: (this is no applicable at Centos 8)

chown nfsnobody:nfsnobody /mnt/nfs/ -R
chmod 755 /mnt/nfs/

And edit file /etc/exports for this folder to by allowed for everybody in network:

/mnt/nfs *(rw,sync,no_root_squash,no_all_squash)

And apply this change:

exportfs -arv

We can see our settings with command “exportfs”:

/mnt/nfs        <world>

And from other linux machine, we can mount this folder:

mount 11.22.33.44:/mnt/nfs /mnt/nfs/
#see this disk report space
df -h
Filesystem            Size  Used Avail Use% Mounted on
11.22.33.44:/mnt/nfs
                      1.5T  200G  1.3T  14% /mnt/nfs

And we can test it with 1GB file:

dd if=/dev/zero of=/mnt/nfs/1gb bs=1M count=1000
1048576000 bytes (1.0 GB) copied, 16.4533 s, 63.7 MB/s
...
...
ls -lah /mnt/nfs/
drwxr-xr-x. 18 nfsnobody nfsnobody  4.0K Feb 28 10:47 .
drwxr-xr-x.  3 root      root       4.0K Feb 28 10:24 ..
-rw-r--r--.  1 root      root      1000M Feb 28 10:47 1gb

Now we can continue with installing apache web server:

yum install httpd -y
systemctl enable httpd.service
firewall-cmd --add-service=http --permanent
firewall-cmd --reload

Now, we create an configuration file for one folder from nfs storage:

vim /etc/httpd/conf.d/media.exmaple.com.conf
<VirtualHost *:80>
ServerAdmin user@example.com
DocumentRoot "/mnt/nfs/kadeco/installs"
ServerName installs.example.com
<Directory "/mnt/nfs/kadeco/installs">
AllowOverride All
Require all granted
Options Indexes
</Directory>
ErrorLog /var/log/httpd/installs.example.com-error_log
CustomLog /var/log/httpd/installs.example.com-access_log common
</VirtualHost>

But we cannot serve this directory:

AH01276: Cannot serve directory /mnt/nfs/kadeco/installs: No matching DirectoryIndex (index.html) found, and server-generated directory index forbidden by Options directive

So, we install som softvare to modify file and folders context with selinux:

yum install setroubleshoot

And change context to this folder:

semanage fcontext -a -t httpd_sys_content_t "/mnt/nfs/kadeco/installs(/.*)?"
restorecon -R /mnt/nfs/kadeco/installs
rm /etc/httpd/conf.d/welcome.conf
systemctl restart httpd.service

Have a fun 🙂

Total Page Visits: 151226 - Today Page Visits: 20

How to install OpenManage Server Administrator

During the last upgrade of xenserver from version 6.0.2 to 6.5, we lose management of our server dell . We have an idrac 6 express and there is no way to manage disk storages and raid perc H700 with virtual drives. The only way is to use OMSA.  So this post is about to install OMSA on xenserver 6.5 SP1 on Dell PowerEdge R515.
I do it with dell documentation from their webpage with some modifications:

http://linux.dell.com/repo/hardware/Linux_Repository_14.12.00/

So, we must install dell omsa repository:

wget -q -O - http://linux.dell.com/repo/hardware/Linux_Repository_14.12.00/bootstrap.cgi | bash

Next, we install the recquire software with all dependencies:

yum install srvadmin-all -y

I tried version 15.04.00 and 15.07.00 and not working with following error:

yum install srvadmin-all
Loaded plugins: fastestmirror
Determining fastest mirrors
.....
http://linux.dell.com/repo/hardware/Linux_Repository_15.07.00/platform_independent/rh50_64/repodata/repomd.xml: [Errno 14] HTTP Error 404: Not Found
Trying other mirror.
Error: Cannot retrieve repository metadata (repomd.xml) for repository: dell-omsa-indep. Please verify its path and try again

So its working for me with version 14.12.00. Next, we must add a rule to iptables, to allow traffic for port 1311/tcp:

-A RH-Firewall-1-INPUT -m conntrack --ctstate NEW -m tcp -p tcp --dport 1311 -j ACCEPT

And finally, we have to start this service, which starts all necessary services:

/opt/dell/srvadmin/sbin/srvadmin-services.sh start

We can try it with telnet to this port. And then, we can access our OMSA throught IP address and port:

https://11.22.33.44:1311

On windows 10 and windows 7 on newest firefox, I find an error.  The DHE key is very short. Maybe the error was there, because self-signed certificate is signed with SHA-1, which is today not trusted. So we must edit firefox preferences like this.

about:config
security.ssl3.dhe_rsa_aes_128_sha;true  >  change to false
security.ssl3.dhe_rsa_aes_256_sha;true  >  change to false

And now, we can see the login screen. After login, in preferences, general settings and server certificate, change “Key Signing Algorithm (For Self Signed Certificate)”  to SHA256. Then we can restore default settings in firefox, to true for ssl3.dhe….

about:config
security.ssl3.dhe_rsa_aes_128_sha;false  >  change to true
security.ssl3.dhe_rsa_aes_256_sha;false  >  change to true
Total Page Visits: 151226 - Today Page Visits: 20

How to create a raspberry music play server

One time, I must deal with sound on some area in specific time.
So I created a raspberry based server, which runs, control’s and deal with radio stream. I used rpi1 – raspberry 1.
Maybe this can help someone.
Firts, we download Raspbian Jessie Lite and burn this image on sdhc card (of 2GB capacity at least):

wget https://downloads.raspberrypi.org/raspbian_lite_latest
unzip 2017-01-11-raspbian-jessie-lite.zip
dd if=2017-01-11-raspbian-jessie-lite.img of=/dev/sdb bs=4M
#make sure, that /dev/sdb is your sdhc card, free to format

After first use, make some enhacements and customizing:

sudo tune2fs -c 1 /dev/mmcblk0p2
#this force to check sdhc card every reboot for errors

Edit /ets/fstab and force to use some log destination to ramdisk and with less write operations.
Because after some time, the sdhc card may fail because of many writing operations on it. In my case, I deal with three bad shdc cards in two years.
– option noatime (Do  not  update  inode  access  times on this filesystem)

/etc/fstab:
none        /var/log        tmpfs   size=1M,noatime         00
none        /var/tmp        tmpfs   size=1M,noatime         00
none        /tmp            tmpfs   size=1M,noatime         00

Next, I disabled swap, because I didn’t need it:

dphys-swapfile swapoff
dphys-swapfile uninstall
update-rc.d dphys-swapfile remove
#check:
free -mh

And finally, install some software, create some scripts, to deal with the music itself.

#I prefer omxplayer
sudo apt-get install omxplayer
mkdir /home/pi/stream

First script, that will be used in cron:

cat stream/script_audio.sh
#!/bin/bash
if ps x |grep -v grep |grep -c "omxplayer.bin"
 then
  echo "everything is ok"
 else
    echo "omxplayer missing, starting..."
    sh /home/pi/stream/vlna.sh &
fi

This script starts to play our live radio.

cat stream/vlna.sh
#!/bin/bash
omxplayer --vol -200 http://stream.radiovlna.sk/vlna-hi.mp3 &
exit 0

And useful script to kill omxplayer from services and stop playing

cat stream/kill_omx.sh
#!/bin/bash
omx=`ps ax |grep -v grep |grep "omxplayer.bin"  | awk '{print $1}'`
kill $omx
exit 0

Every script must have execute permision:

chmod +x *.sh

And use crontab, for enable playing. This option runs script every minute every
day in week between 6 am. and 6pm. (from Monday to friday)

*/1 6-18 * * 1-5 sh /home/pi/stream/script_audio.sh &

So, if this will help to somebody, i will be happy 🙂
Have a nice day.
@vasil

Total Page Visits: 151226 - Today Page Visits: 20

Rsync review and some examples

rsync — a fast, versatile, remote (and local) file-copying tool
-a        archive mode
-r        recursive – recurse into directories
-v         verbose – increase verbosity
-z        compress – With this option, rsync compresses the file data as it is sent to the destination machine, which  reduces the amount of data being transmitted something that is useful over a slow connection Note  that  this  option typically achieves better compression ratios than can be achieved by using a compressing remote shell or a compressing transport because it takes advantage of the implicit information in the matching data blocks that are not explicitly sent over the connection
-P        is equivalent to –partial –progress.  Its purpose is to make it  much  easier     to  specify these two options for a long transfer that may be interrupted
-n        perform a trial run with no changes made
-u        skip files that are newer on the receiver
-t        preserve modification times
–bwlimit=KBPS    limit I/O bandwidth; KBytes per second
This option allows you to specify a maximum transfer rate in kilobytes per second.  This  option  is  most effective  when using rsync with large files (several megabytes and up). Due to the nature of rsync transfers, blocks of data are sent, then if rsync determines the transfer was too fast,  it  will  wait  before
sending  the next data block. The result is an average transfer rate equaling the specified limit. A value of zero specifies no limit.
(25Mb = 3200 KB)
(10Mb = 1250 KB)
(7.5 Mb = 960 KB)
(5Mb = 640 KB)
(2.5Mb = 320 KB)
(3Mb = 384 KB)
(1Mb = 128 KB)
–append              append data onto shorter files
–append-verify        append w/old data in file checksum

rsync -avz foo:src/bar /data/tmp

This  would  recursively  transfer all files from the directory src/bar on the machine foo into the /data/tmp/bar directory on the local machine. The files are transferred in “archive” mode, which ensures that  symbolic  links,
devices, attributes, permissions, ownerships, etc. are preserved in the transfer.  Additionally, compression will be used to reduce the size of data portions of the transfer.
– Trailing slash on the source avoid to create directory on the destinations. So without trailing slash at the end, this will
create this directory at the destination. This is the same

 rsync -av /src/foo /dest
 rsync -av /src/foo/ /dest/foo

This will synchronize and copy left folder to to right. It preserve unfinished files. With next commenad, it will resume
and append data to unfinished files.

rsync -avP /mnt/nfs /media/adm-nfs/
rsync -avP --append /mnt/nfs /media/adm-nfs/
Total Page Visits: 151226 - Today Page Visits: 20

hdparm useful commands

Some useful commands:
This check current IDE power mode status of the disk:
– unknown (drive does not support this command),
– active/idle (normal operation),
– standby (low power mode, drive has spun down),
– sleeping (lowest power mode, drive is completely shut down)
The operators: -S, -y, -Y, -Z can be used to manipulate the IDE power modes

hdparm -C /dev/sda

Force an IDE drive to immediately enter the low power consumption STANDBY mode, usually causing it to spin down:

hdparm -y /dev/sda

Force  an  IDE  drive to immediately enter the lowest power consumption sleep mode, causing it to shut down completely. A hard or soft reset is required before the drive can be accessed again:

hdparm -Y /dev/sda

Put the drive into idle  (low-power)  mode,  and  also  set  the standby (spindown) timeout for the drive.  This timeout value is used by the drive to determine how long to wait  (with  no  disk activity)  before  turning  off the spindle motor to save power:

hdparm -S /dev/sda

Disable  the  automatic power-saving function of certain Seagate drives (ST3xxx models?), to prevent them  from  idling/spinning down at inconvenient times.
An example:

hdparm -y /dev/sdd
/dev/sdd
      issuing standby command
hdparm -C /dev/sdd
/dev/sdd
      drive state is: standby


And this is the READ test of the disk:

 hdparm -Tt /dev/sdc
/dev/sdc:
Timing cached reads: 21590 MB in 1.99 seconds = 10828.31 MB/sec
Timing buffered disk reads: 310 MB in 3.00 seconds = 103.20 MB/sec

Total Page Visits: 151226 - Today Page Visits: 20