I assume, that we have working Centos 8 Stream system. So, in this example, we will have three systems (nodes), with identical HW resources (4 GB ram, 4 vCPU, two NICs – one internal for ceph and one for world, and 10 TB spin-up hdd). In this article, every command must be run on all nodes. Public network is 192.168.1.0/24 and Ceph separate network is 192.168.2.0/24
Setting up time
As the first step, we must set up a time, I use chrony:
dnf install chrony -y
systemctl enable chronyd
timedatectl set-timezone Europe/Bratislava
timedatectl
Now, edit some variables in configurations file for chronyd. Add some servers from pool, and edit local subnets, where we delived time:
vim /etc/chrony.conf

pool 2.centos.pool.ntp.org iburst
pool 1.centos.pool.ntp.org iburst
pool 3.centos.pool.ntp.org iburst
Now start/restart our service, and check, if it is working:
systemctl restart chronyd
systemctl status chronyd.service
chronyc sources
Create hostnames, ssh rsa-keys, update and install som packages
Now, we must edit on all nodes our hostnames, set it permanent:
hostnamectl set-hostname ceph1
Now, add all hostnames, and IPs to file /etc/hosts:
tee -a /etc/hosts<<EOF
192.168.1.1    ceph1
192.168.1.2    ceph2
192.168.1.3    ceph3
192.168.2.1    ceph1-cluster
192.168.2.2    ceph2-cluster
192.168.3.3    ceph3-cluster

EOF
Now, create rsa-key pair, for password-less connect to and from each node:
ssh-keygen -t rsa -b 4096 -C "ceph1"

means:
-b bits. Number of bits in the key to create
-t type. Specify type of key to create
-C comment
And copy it to other nodes:
for host in ceph1 ceph2 ceph3; do
 ssh-copy-id root@$host
done
Now update and install packages:
dnf update -y
-reboot-
dnf install git vim bash-completion python3-pip
Preparing for ceph
Now, install epel repository and enable powertools:
dnf -y install dnf-plugins-core
dnf -y install https://dl.fedoraproject.org/pub/epel/epel-release-latest-8.noarch.rpm
dnf config-manager --set-enabled powertools

dnf repolist
repo id            repo name
appstream          CentOS Stream 8 - AppStream
epel               Extra Packages for Enterprise Linux 8 - x86_64
epel-modular       Extra Packages for Enterprise Linux Modular 8 - x86_64
epel-next          Extra Packages for Enterprise Linux 8 - Next - x86_64
extras             CentOS Stream 8 - Extras
powertools         CentOS Stream 8 - PowerTools
Clone Ceph Ansible repository:
cd /root/
git clone https://github.com/ceph/ceph-ansible.git
Choose ceph-ansible branch you wish to use. The command Syntax is: git checkout $branch
I’ll switch to stable-5.0 which supports Ceph octopus version.
cd ceph-ansible
git checkout stable-5.0

pip3 install setuptools-rust
pip3 install wheel
export CRYPTOGRAPHY_DONT_BUILD_RUST=1
pip3 install --upgrade pip

pip3 install -r requirements.txt
echo "PATH=\$PATH:/usr/local/bin" >>~/.bashrc
source ~/.bashrc
Confirm Ansible version installed.
ansible --version
ansible 2.9.26
  config file = /root/ceph-ansible/ansible.cfg
  configured module search path = ['/root/ceph-ansible/library']
  ansible python module location = /usr/local/lib/python3.6/site-packages/ansible
  executable location = /usr/local/bin/ansible
  python version = 3.6.8 (default, Sep 10 2021, 09:13:53) [GCC 8.5.0 20210514 (Red Hat 8.5.0-3)]
Now, we find, which OSD (spin-up disks) are ready for us. In each my node, there is free disk /dev/sda. Look via lsblk:
lsblk
NAME                    MAJ:MIN RM  SIZE RO TYPE MOUNTPOINT
sda                       8:0    0 10.7T  0 disk
sr0                      11:0    1 1024M  0 rom
vda                     252:0    0   32G  0 disk
├─vda1                  252:1    0  512M  0 part /boot
└─vda2                  252:2    0 31.5G  0 part
  ├─centos--vg0-root    253:0    0    3G  0 lvm  /
  ├─centos--vg0-swap    253:1    0    1G  0 lvm  [SWAP]
  ├─centos--vg0-tmp     253:2    0  512M  0 lvm  /tmp
  ├─centos--vg0-var_log 253:3    0  512M  0 lvm  /var/log
  ├─centos--vg0-var     253:4    0    3G  0 lvm  /var
  └─centos--vg0-home    253:5    0    2G  0 lvm  /home
Now, we are ready for installation of Ceph
Deploy Ceph Octopus (15) Cluster on CentOS 8 stream
Now, we are play some things 🙂 The first node (ceph1) I use as admin node for installation. Configure Ansible Inventory and Playbook files. Create Ceph Cluster group variables file on the admin node
cd /root/ceph-ansible
cp group_vars/all.yml.sample  group_vars/all.yml
vim group_vars/all.yml
And edit some variables of your Ceph cluster, as you fit:
#General
cluster: ceph

# Inventory host group variables
mon_group_name: mons
osd_group_name: osds
rgw_group_name: rgws
mds_group_name: mdss
nfs_group_name: nfss
rbdmirror_group_name: rbdmirrors
client_group_name: clients
iscsi_gw_group_name: iscsigws
mgr_group_name: mgrs
rgwloadbalancer_group_name: rgwloadbalancers
grafana_server_group_name: grafana-server

# Firewalld / NTP
configure_firewall: True
ntp_service_enabled: true
ntp_daemon_type: chronyd

# Ceph packages
ceph_origin: repository
ceph_repository: community
ceph_repository_type: cdn
ceph_stable_release: octopus

# Interface options
monitor_interface: ens18
radosgw_interface: ens18
public_network: 192.168.1.0/24
cluster_network: 192.168.2.0/24


# DASHBOARD
dashboard_enabled: True
dashboard_protocol: http
dashboard_admin_user: admin
dashboard_admin_password: strongpass

grafana_admin_user: admin
grafana_admin_password: strongpass
Now, set your OSDs. Create a new ceph nodes ansible inventory. Properly set your inventory file. Below is my inventory. Modify inventory groups the way you want services installed in your cluster nodes.
vim hosts

# Ceph admin user for SSH and Sudo
[all:vars]
ansible_ssh_user=root
ansible_become=true
ansible_become_method=sudo
ansible_become_user=root

# Ceph Monitor Nodes
[mons]
ceph1
ceph2
ceph3

# MDS Nodes
[mdss]
ceph1
ceph2
ceph3

# RGW
[rgws]
ceph1
ceph2
ceph3

# Manager Daemon Nodes
[mgrs]
ceph1
ceph2
ceph3

# set OSD (Object Storage Daemon) Node
[osds]
ceph1
ceph2
ceph3

# Grafana server
[grafana-server]
ceph1
Create Playbook file by copying a sample playbook at the root of the ceph-ansible project called site.yml.sample.
cp site.yml.sample site.yml
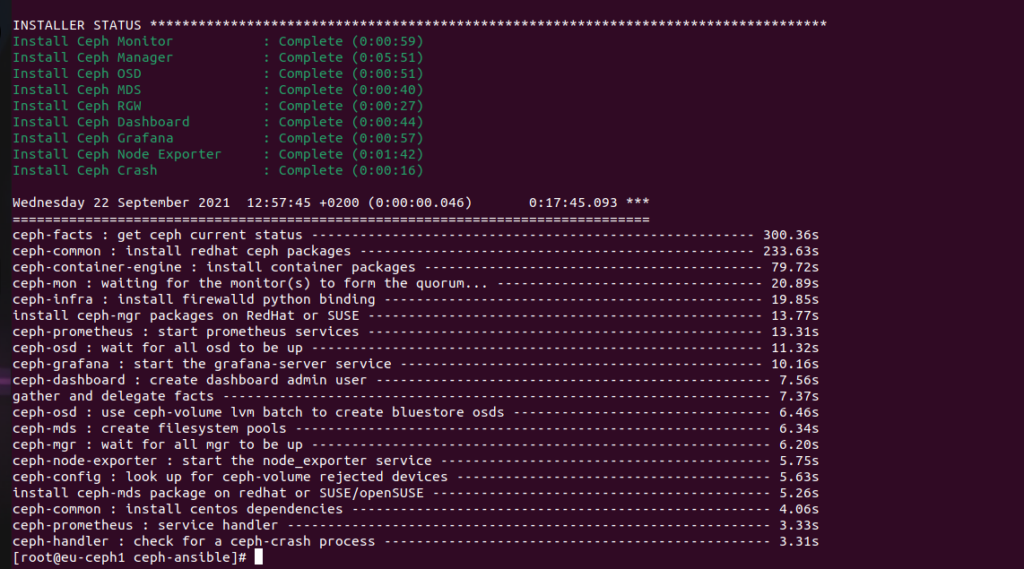
Run Playbook.
ansible-playbook -i hosts site.yml
If installation was successful, a health check should return OK or minimal WARN.
# ceph -s
  cluster:
    id:     dcfd26f5-49e9-4256-86c2-a5a0deac7b54
    health: HEALTH_WARN
            mons are allowing insecure global_id reclaim

  services:
    mon: 3 daemons, quorum eu-ceph1,eu-ceph2,eu-ceph3 (age 67m)
    mgr: ceph2(active, since 55m), standbys: ceph3, ceph1
    mds: cephfs:1 {0=ceph1=up:active} 2 up:standby
    osd: 3 osds: 3 up (since 60m), 3 in (since 60m)
    rgw: 3 daemons active (ceph1.rgw0, ceph2.rgw0, ceph3.rgw0)

  task status:

  data:
    pools:   7 pools, 169 pgs
    objects: 215 objects, 11 KiB
    usage:   3.1 GiB used, 32 TiB / 32 TiB avail
    pgs:     169 active+clean
This is a screenshot of my installation output once it has been completed.
As you see, I have warning: mons are allowing insecure global_id reclaim
So, silent it, as you fit it, or fix…
ceph config set mon mon_warn_on_insecure_global_id_reclaim_allowed false