How to create ceph Pacific on Centos 8 Stream via Cephadm

Today, we create a ceph network storage on our Centos 8 Stream with cephadm command. We will installing with manual page: https://docs.ceph.com/en/pacific/install/

In this example, we will have three systems (nodes), with identical HW resources (4 GB ram, 4 vCPU, two NICs – one internal for ceph and one for world, and dedicated 4 TB SSD disk for ceph storage). In this article, every command must be run on all nodes. Public network is 192.168.1.0/24 and Ceph separate network is 192.168.2.0/24

So, as a first step, we need to set up our Centos for synchronized time.

Setting up time

As the first step, we must set up a time, I use chrony:

dnf install chrony -y
systemctl enable chronyd
timedatectl set-timezone Europe/Bratislava
timedatectl

Now, edit some variables in configurations file for chronyd. Add some servers from pool, and edit local subnets, where we delived time:

vim /etc/chrony.conf

pool 2.centos.pool.ntp.org iburst
pool 1.centos.pool.ntp.org iburst
pool 3.centos.pool.ntp.org iburst

Now start/restart our service, and check, if it is working:

systemctl restart chronyd
systemctl status chronyd.service
chronyc sources

Create hostnames, ssh rsa-keys and update

Now, we must edit on all nodes our hostnames, set it permanent:

hostnamectl set-hostname ceph1

Now, add all hostnames, and IPs to file /etc/hosts:

tee -a /etc/hosts<<EOF
192.168.1.1    ceph1
192.168.1.2    ceph2
192.168.1.3    ceph3
EOF

Now, create rsa-key pair, for password-less connect to and from each node for root user for installing and updating:

ssh-keygen -t rsa -b 4096 -C "ceph1"

means:
-b bits. Number of bits in the key to create
-t type. Specify type of key to create
-C comment

And copy it to other nodes:

for host in ceph1 ceph2 ceph3; do
 ssh-copy-id root@$host
done

Now update:

dnf update -y
dnf install podman gdisk jq -y
-reboot-

Preparing for ceph

Now, setup a yum/dnf based repository for ceph packages and updates and install package cephadm:

dnf install -y centos-release-ceph-pacific.noarch
dnf install -y cephadm

Now, we can Bootstrap a new cluster. The first step in creating a new Ceph cluster is running the cephadm bootstrap command on the Ceph cluster’s first host. The act of running the cephadm bootstrap command on the Ceph cluster’s first host creates the Ceph cluster’s first “monitor daemon”, and that monitor daemon needs an IP address. You must pass the IP address of the Ceph cluster’s first host to the ceph bootstrap command, so you’ll need to know the IP address of that host.

Now, we can bootstrap our first monitor by command (only on one node!!!):

cephadm bootstrap --mon-ip 192.168.1.1 --cluster-network 192.168.2.0/24

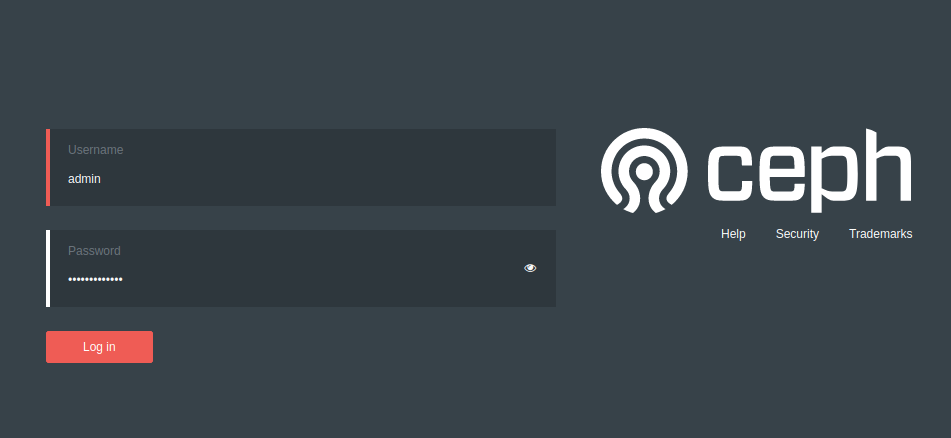
And after some time, we have a working cluster. And we can connect to dashboard.

Generating a dashboard self-signed certificate...
Creating initial admin user...
Fetching dashboard port number...
firewalld ready
Enabling firewalld port 8443/tcp in current zone...
Ceph Dashboard is now available at:

	     URL: https://ceph1.example.com:8443/
	    User: admin
	Password: tralala

Enabling client.admin keyring and conf on hosts with "admin" label
You can access the Ceph CLI with:

	sudo /usr/sbin/cephadm shell --fsid xxx -c /etc/ceph/ceph.conf -k /etc/ceph/ceph.client.admin.keyring

Please consider enabling telemetry to help improve Ceph:
	ceph telemetry on
For more information see:
	https://docs.ceph.com/docs/pacific/mgr/telemetry/

Now, we can log in with web interface (dashboard). At first login, we use mentioned username and password and we have to change our password.

But our cluster is not finished, yet 🙂

So, we continue. On first node (ceph1), where we bootstrap ceph, we can view status ceph by command:

cephadm shell -- ceph -s

cluster:
    id:     77e12ffa-c017-11ec-9124-c67be67db31c
    health: HEALTH_WARN
            OSD count 0 < osd_pool_default_size 3
 
  services:
    mon: 1 daemons, quorum ceph1 (age 26m)
    mgr: ceph1.rgzjga(active, since 23m)
    osd: 0 osds: 0 up, 0 in
 
  data:
    pools:   0 pools, 0 pgs
    objects: 0 objects, 0 B
    usage:   0 B used, 0 B / 0 B avail
    pgs:     

But checking status of ceph by this way is difficulty, so we install ceph-common package by cephadm on every node:

cephadm add-repo --release pacific
cephadm install ceph-common
ceph status

  cluster:
    id:     77e12ffa-c017-11ec-9124-c67be67db31c
    health: HEALTH_WARN
            OSD count 0 < osd_pool_default_size 3
 
  services:
    mon: 1 daemons, quorum ceph1 (age 27m)
    mgr: ceph1.rgzjga(active, since 24m)
    osd: 0 osds: 0 up, 0 in
 
  data:
    pools:   0 pools, 0 pgs
    objects: 0 objects, 0 B
    usage:   0 B used, 0 B / 0 B avail
    pgs:     

Now, we copy ceph ssh pubkeys to other hosts for working each-other with ceph and passwordless:

ssh-copy-id -f -i /etc/ceph/ceph.pub root@ceph2
ssh-copy-id -f -i /etc/ceph/ceph.pub root@ceph3

And now, we can add this nodes to ceph, runnig from first node (where we bootstrap ceph).After this commands, wait some time, for podman to deploy containers (monitor, manager). And label them as admin.

ceph orch host add ceph2 192.168.1.2
ceph orch host add ceph3 192.168.1.3
ceph orch host label add ceph2 _admin
ceph orch host label add ceph3 _admin

Now, we can look, which disks are available for us:

ceph orch device ls
HOST          PATH      TYPE  DEVICE ID                   SIZE  AVAILABLE  REJECT REASONS  
ceph1  /dev/sda  ssd   QEMU_HARDDISK_drive-scsi2  4000G  Yes                        
ceph2  /dev/sda  ssd   QEMU_HARDDISK_drive-scsi2  4000G  Yes                        
ceph3  /dev/sda  ssd   QEMU_HARDDISK_drive-scsi2  4000G  Yes      

So, now we can create an OSD disks from these devices.

ceph orch daemon add osd ceph1:/dev/sda
    Created osd(s) 0 on host 'ceph1'

ceph orch daemon add osd ceph2:/dev/sda
    Created osd(s) 1 on host 'ceph2'

ceph orch daemon add osd ceph3:/dev/sda
    Created osd(s) 2 on host 'ceph3'

ceph -s
  cluster:
    id:     77e12ffa-c017-11ec-9124-c67be67db31c
    health: HEALTH_OK
 
  services:
    mon: 3 daemons, quorum ceph1,ceph3,ceph2 (age 8m)
    mgr: ceph1.vsshgj(active, since 8m), standbys: ceph3.ctsxnh
    osd: 3 osds: 3 up (since 21s), 3 in (since 46s)
 
  data:
    pools:   1 pools, 1 pgs
    objects: 0 objects, 0 B
    usage:   15 MiB used, 11 TiB / 11 TiB avail
    pgs:     1 active+clean

Now, if we want create a ceph filesystem cephfs, we must create two pool. One for data and one for metadata. so, execute commands below on one ceph node:

ceph osd pool create cephfs_data
ceph osd pool create cephfs_metadata
ceph fs new cephfs cephfs_metadata cephfs_data

Now, log into Ceph dashboard a we can see, that health is RED and there is error.We must create a mds services:

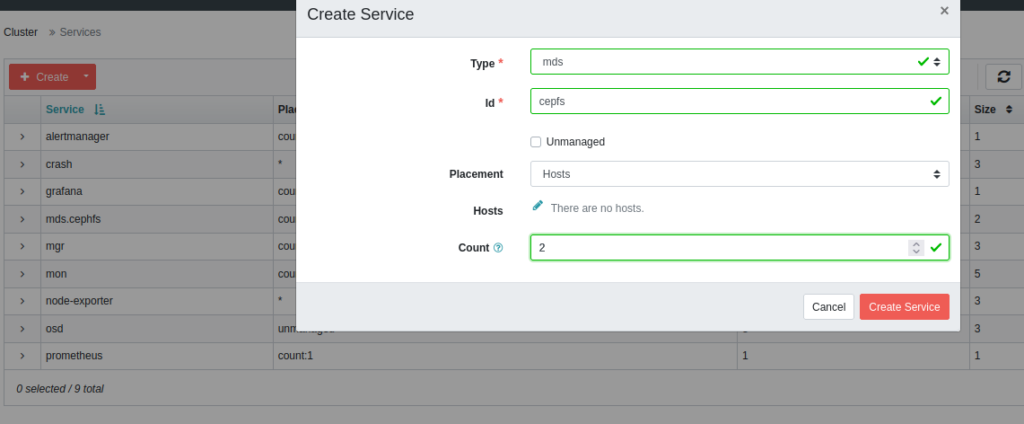
This deploys mds services to our nodes (one become active and one become standby).

Now, we can continue by command line and create an user, which can mount and write to these cephfs:

ceph auth add client.cephfs mon 'allow r' osd 'allow rwx pool=cephfs_data'
ceph auth caps client.cephfs mds 'allow r,allow rw path=/' mon 'allow r' osd 'allow rw pool=cephfs_data' osd 'allow rw pool=cephfs_metadata' 

#and see our caps:
ceph auth get client.cephfs

[client.cephfs]
	key = agvererbrtbrttnrsasda/a5/dd==
	caps mds = "allow r,allow rw path=/"
	caps mon = "allow r"
	caps osd = "allow rw pool=cephfs_data"

Now, we can export or copy out our key and save it to a file. And now, we can mount those cephfs on another linux:

mount -t ceph ceph1.example.com:/ /mnt/cephfs -o name=cephfs,secretfile=/root/cephfs.key -v

df -h
Filesystem                      Size  Used Avail Use% Mounted on
192.168.1.1:/                  3.5T     0  3.5T   0% /mnt/cephfs

If we want check, if we have enabled compression, so, execute:

ceph osd pool get cephfs_data compression_algorithm
     Error ENOENT: option 'compression_algorithm' is not set on pool 'cephfs_data'

ceph osd pool get cephfs_data compression_mode
     Error ENOENT: option 'compression_mode' is not set on pool 'cephfs_data'

If we want compression, enable it and set algorithm. Mode of compression, you can learn: read about – https://docs.ceph.com/en/latest/rados/operations/pools/

We can see, that there are data, but no compression:

ceph df detail

So enable it on both cephfs pools:

ceph osd pool set cephfs_data compression_mode aggressive
ceph osd pool set cephfs_data compression_algorithm lz4
ceph osd pool set cephfs_metadata compression_mode aggressive
ceph osd pool set cephfs_metadata compression_algorithm lz4

# and see:

ceph osd pool get cephfs_data compression_algorithm
      compression_algorithm: lz4
ceph osd pool get cephfs_data compression_mode
      compression_mode: aggressive

And after som copy data, we can see:

Have a nice day

Total Page Visits: 153401 - Today Page Visits: 68

How to install nextcloud v18 on Centos 8 Stream

I create a basic installation of Centos 8 stream from iso: CentOS-Stream-8-x86_64-20191219-boot.iso

During installation I choose minimal applications and standard utilities. Please, enable, network time and set lvm for virtio disk. I set password for root and create a new user, which have root privileges.

After instalation, I create and LVM encrypted partition, to store encrypted data of nextcloud on it. I will not use nextcloud data encryption. Command below creates encrypted disk. We must enter a passphrase twice

 cryptsetup -y -v luksFormat /dev/vdb

Now, we open this partition and look at status:

cryptsetup luksOpen /dev/vdb vdb_crypt
cryptsetup -v status vdb_crypt

/dev/mapper/vdb_crypt is active.
   type:    LUKS2
   cipher:  aes-xts-plain64
   keysize: 512 bits
   key location: keyring
   device:  /dev/vdb
   sector size:  512
   offset:  32768 sectors
   size:    209682432 sectors
   mode:    read/write
 Command successful.

Now, I write 4GB zeros to this device to see, if everything is OK. It is possible, to full-up tho whole device, but it can take a long time. But the true reason is, that this will allocate block data with zeros. This ensures that outside world will see this as random data i.e. it protect against disclosure of usage patterns.

dd if=/dev/zero of=/dev/mapper/vdb_crypt bs=4M count=1000
4194304000 bytes (4.2 GB, 3.9 GiB) copied, 130.273 s, 32.2 MB/s

Now try close and open this encrypted device. And then, I create an lvm above the luks encrypted disk:

cryptsetup luksClose vdb_crypt
cryptsetup luksOpen /dev/vdb vdb_crypt
cryptsetup -v status vdb_crypt
pvcreate /dev/mapper/vdb_crypt
vgcreate nextcloud /dev/mapper/vdb_crypt
lvcreate -n data -L+30G nextcloud
mkdir /mnt/test
mkfs.xfs /dev/mapper/nextcloud-data
mount /dev/mapper/nextcloud-data /mnt/test/
touch /mnt/test/hello 
ll /mnt/test/hello
umount /mnt/test/

Installing nextcloud and prerequisites

And now, we can start with preparing our Centos for nextcloud

At first, update system. Via dnf (DNF is the next upcoming major version of YUM, a package manager for RPM-based Linux distributions. It roughly maintains CLI compatibility with YUM and defines a strict API for extensions and plugins.)

dnf update -y

Next, we install and create empty database for our nextcloud. Then we start it and enable for autostart after boot.
If you wish, you can skip installations of MariaDB and you can use built-in SQLite. Then you can continue with installing apache web server.

dnf -y install mariadb-server
...
systemctl start mariadb
systemctl enable mariadb

Now, we run post installation script to finish setting up mariaDB server:

mysql_secure_installation
Set root password? [Y/n] y
Remove anonymous users? [Y/n] y
Disallow root login remotely? [Y/n] y
Remove test database and access to it? [Y/n] y
Reload privilege tables now? [Y/n] y

Now, we can create a database for nextcloud.

mysql -u root -p
...
CREATE DATABASE nextcloud;
GRANT ALL PRIVILEGES ON nextcloud.* TO 'nextclouduser'@'localhost' IDENTIFIED BY 'YOURPASSWORD';
FLUSH PRIVILEGES;
exit;

Now, we install Apache web server, and we start it and enable for autostart after boot:

dnf install httpd -y
systemctl start httpd.service
systemctl enable httpd.service

And set up firewall fow port http/80 and ssh/20 only:

systemctl status httpd
firewall-cmd --list-all
firewall-cmd --zone=public --permanent --remove-service=dhcpv6-client
firewall-cmd --zone=public --permanent --add-service=http
firewall-cmd --reload

Now point your browser to this server and look, if you see a Apache test page.

Now we can install php. Nextcloud (at this time is version 18.0.1) and support PHP (7.1, 7.2 or 7.3). So I use remi repositories and install php 7.3:

dnf -y install dnf-utils http://rpms.remirepo.net/enterprise/remi-release-8.rpm
dnf module list php
dnf module reset php
dnf module enable php:remi-7.3
dnf info php
dnf install php php-gd php-mbstring php-intl php-pecl-apcu php-mysqlnd php-pecl-imagick.x86_64 php-ldap php-pecl-zip.x86_64 php-process.x86_64
php -v
php --ini |grep Loaded
sed -i "s/post_max_size = 8M/post_max_size = 500M/" /etc/php.ini
sed -i "s/upload_max_filesize = 2M/upload_max_filesize = 500M/" /etc/php.ini
sed -i "s/memory_limit = 128M/memory_limit = 512M/" /etc/php.ini
systemctl start php-fpm.service
systemctl enable php-fpm.service

And now, we can install nextcloud:

mkdir -p /var/www/html/nextcloud/data
cd /var/www/html/nextcloud/
mount /dev/mapper/nextcloud-data /var/www/html/nextcloud/data/
wget https://download.nextcloud.com/server/releases/nextcloud-18.0.1.zip
unzip nextcloud-18.0.1.zip
rm nextcloud-18.0.1.zip
mv nextcloud/* .
mv nextcloud/.htaccess .
mv nextcloud/.user.ini .
rmdir nextcloud/
mkdir /var/www/html/nextcloud/data
chown -R apache:apache /var/www/html/nextcloud/
find /var/www/html/nextcloud/ -type d -exec chmod 750 {} \; 
find /var/www/html/nextcloud/ -type f -exec chmod 640 {} \;

Now create configuration file for nextcloud in httpd:

vim /etc/httpd/conf.d/nextcloud.conf
<VirtualHost *:80>
  DocumentRoot /var/www/html/nextcloud/
  ServerName  your.server.com

  <Directory /var/www/html/nextcloud/>
    Require all granted
    AllowOverride All
    Options FollowSymLinks MultiViews

    <IfModule mod_dav.c>
      Dav off
    </IfModule>

  </Directory>
</VirtualHost>
apachectl graceful

Refer to nextcloud admin manual, you can run into permissions problems. Run these commands as root to adjust permissions:

semanage fcontext -a -t httpd_sys_rw_content_t '/var/www/html/nextcloud/data(/.*)?'
semanage fcontext -a -t httpd_sys_rw_content_t '/var/www/html/nextcloud/config(/.*)?'
semanage fcontext -a -t httpd_sys_rw_content_t '/var/www/html/nextcloud/apps(/.*)?'
semanage fcontext -a -t httpd_sys_rw_content_t '/var/www/html/nextcloud/.htaccess'
semanage fcontext -a -t httpd_sys_rw_content_t '/var/www/html/nextcloud/.user.ini'
restorecon -Rv '/var/www/html/nextcloud/'

If you see error “-bash: semanage: command not found”, install packages:

dnf provides /usr/sbin/semanage
dnf install policycoreutils-python-utils-2.9-3.el8_1.1.noarch

Now, we can check via built-in php scripts, in what state we are:

cd /var/www/html/nextcloud/
sudo -u apache php occ -h
sudo -u apache php occ -V
sudo -u apache php occ status

And finally, we can access our nextcloud and set up administrators password via our web: http://you-ip/

If you see default httpd welcome page, disable all lines in: /etc/httpd/conf.d/welcome.conf
Now you must complete the installation via web interface. Set Administrator’s password and locate to MariaDB with used credentials:

Database user: nextclouduser
Database password: YOURPASSWORD
Database name: nextcloud
host: localhost

In settings of nextcloud, go to section Administration > Overview. You can see some problems. If so, try to fix it. I had three problems. No apcu memory cache configured. So add at nextcloud config.php:

'memcache.local' => '\OC\Memcache\APCu',

Then I must edit som php variables, to set properly opcache: edit and adjust:

vim /etc/php.d/10-opcache.ini

Then I must edit httpd setting, because .htaccess wont working. So change apache config:

vim /etc/httpd/conf/httpd.conf

section: Directory "/var/www/html"
AllowOverride None
change to: 
AllowOverride All

And gracefuly restart apache:

apachectl graceful

Next, I find out, that my nextcloud instance cannot connect to internet and checks for update. I think, that this is on selinux (enforcing mode). So run check and find out, what is happening:

sealert -a /var/log/audit/audit.log

And the result:

SELinux is preventing /usr/sbin/php-fpm from name_connect access on the tcp_socket port 80
Additional Information:
Source Context                system_u:system_r:httpd_t:s0
Source Path                   /usr/sbin/php-fpm
Port                          80
Selinux Enabled               True
Policy Type                   targeted
Enforcing Mode                Enforcing
---------
If you believe that php-fpm should be allowed name_connect access on the port 80 tcp_socket by default.
If you want to allow httpd to can network connect
Then you must tell SELinux about this by enabling the 'httpd_can_network_connect' boolean.

So I allow httpd to can network connect via:

setsebool -P httpd_can_network_connect 1

And that is complete. If you wont secure http (https), try to find out another post on this page.

Have fun

Total Page Visits: 153401 - Today Page Visits: 68

Install WordPress on Centos-8-stream with apache (httpd)

I started on clean centos-8 server, created from netinstall cd. It is minimal instalation. So, lets begun. Check the version, to be installed:

dnf info httpd
Name         : httpd
 Version      : 2.4.37
 Release      : 11.module_el8.0.0+172+85fc1f40

So, let install it and allow http port on firewalld. And start apache server itself.

dnf install httpd
firewall-cmd --add-service=http --permanent
firewall-cmd --reload
systemctl start httpd.service
systemctl enable httpd.service

Now, you can point you web browser to IP on this server and you should see the welcome page of apache web server on centos.

Now create a directory, where we place our content and simple web page to test, if its working.

mkdir -p /var/www/vhosts/com.example.www
vim /var/www/vhosts/com.example.www/index.html
<html>
  <head>
    <title>Welcome to www.example.com!</title>
  </head>
  <body>
    <h1>Success!  The www.example.com virtual host is working!</h1>
  </body>
</html>

And now, create for this page own configuration in httpd:

vim /etc/httpd/conf.d/com.example.www.conf
<VirtualHost *:80>
    ServerAdmin admin@example.com
    DocumentRoot "/var/www/vhosts/com.example.www"
    ServerName www.example.com

ErrorLog /var/log/httpd/com.example.www-error_log
CustomLog /var/log/httpd/com.example.www-access_log common
</VirtualHost>

And now, gracefully restart your web server and point your browser to you domain: www.example.com (I edit my /etc/hosts to point this domain at my internal IP).

apachectl graceful

If you test page is working, lets begin with more thinks. We must install additional packages (software) for wordpress. Its mysql server and php. As mysql server, I use mariadb. Then create an initial configuration for mysql and create database for wordpress. I set no password for mysql.

dnf install mariadb-server mariadb
systemctl start mariadb
systemctl enable mariadb
mysql_secure_installation
   Set root password? [Y/n] n
   Remove anonymous users? [Y/n] y
   Disallow root login remotely? [Y/n] y
   Remove test database and access to it? [Y/n] y
   Reload privilege tables now? [Y/n] y

mysql -u root -p
   CREATE DATABASE wordpress;
   CREATE USER wordpressuser@localhost IDENTIFIED BY 'BESTpassword';
   GRANT ALL PRIVILEGES ON wordpress.* TO wordpressuser@localhost IDENTIFIED BY 'BESTpassword';
   FLUSH PRIVILEGES;
   exit;

When we find, which version of php will be standard installed, I decided to use another package sources and install newer php version 7.3

dnf info php
 Available Packages
 Name         : php
 Version      : 7.2.11

dnf install http://rpms.remirepo.net/enterprise/remi-release-8.rpm
dnf update
dnf install php73
dnf install php73-php-fpm.x86_64 php73-php-mysqlnd.x86_64
systemctl start php73-php-fpm.service
systemctl enable php73-php-fpm.service
ln -s /usr/bin/php73 /usr/bin/php
php -v
   PHP 7.3.10 (cli) (built: Sep 24 2019 09:20:18) ( NTS )

Now, create simple test php page, to view php by apache if its working.

vim /var/www/vhosts/com.example.www/foo.php
<?php
  phpinfo();
?>

Restart apache web server and point your browser to php:

systemctl restart httpd.service
www.example.com/foo.php

And now you can see informationa page about php on system.

Now we can download wordpress and unpack it.

cd ~ 
wget http://wordpress.org/latest.tar.gz
tar xzvf latest.tar.gz
rsync -avP wordpress/ /var/www/vhosts/com.example.www/
chown -R apache:apache /var/www/vhosts/

Now, we edit configuration and add directory variables about default loding index.php. And remove test files – foo.php, index.html.

rm /var/www/vhosts/com.example.www/foo.php
rm /var/www/vhosts/com.example.www/index.html
vim /etc/httpd/conf.d/com.example.www.conf
<Directory /var/www/vhosts/com.example.www>
DirectoryIndex index.php
</Directory>

And restart apache web server

systemctl restart httpd.service

Now we can continue with setting our wordpress via web browser and our www.example.com page (click refresh in your web browser). Follow the instructions and fill your variables (database name, user, password…).

My installation step 2 tells me, that it cannot write config.php in our content directory. So, I can manually creaty config.php, or find out, what happens. Install selinux troubleshoot packages and run command sealert, which tell us what happend.

dnf install setroubleshoot
sealert -a /var/log/audit/audit.log

I can see this messages:

SELinux is preventing /opt/remi/php73/root/usr/sbin/php-fpm from write access on the directory com.example.www.
If you want to allow php-fpm to have write access on the com.example.www directory
Then you need to change the label on 'com.example.www'
Do
# semanage fcontext -a -t httpd_sys_rw_content_t 'com.example.www'
# restorecon -v 'com.example.www'
Additional Information:
Source Context                system_u:system_r:httpd_t:s0
Target Context                unconfined_u:object_r:httpd_sys_content_t:s0
Target Objects                com.example.www [ dir ]

So I do, what it want. I adapt permissions, that apache/php can write into this diretory.

semanage fcontext -a -t httpd_sys_rw_content_t '/var/www/vhosts/com.example.www(/.*)?'
restorecon -Rv /var/www/vhosts/com.example.www/

Now I can continue with installation. And everything works fine. Have a nice day.

Total Page Visits: 153401 - Today Page Visits: 68